Mothers Day Ideas
3 Mother’s Day origami flower easy craft your love in every petal
Make your own Mother’s Day origami flower easy, why not? These flower origami ideas are so much fun to make and the perfect gift for Mom. Just follow the step-by-step tutorial, and you can create a wonderful present. Let’s start with TeeNavi!
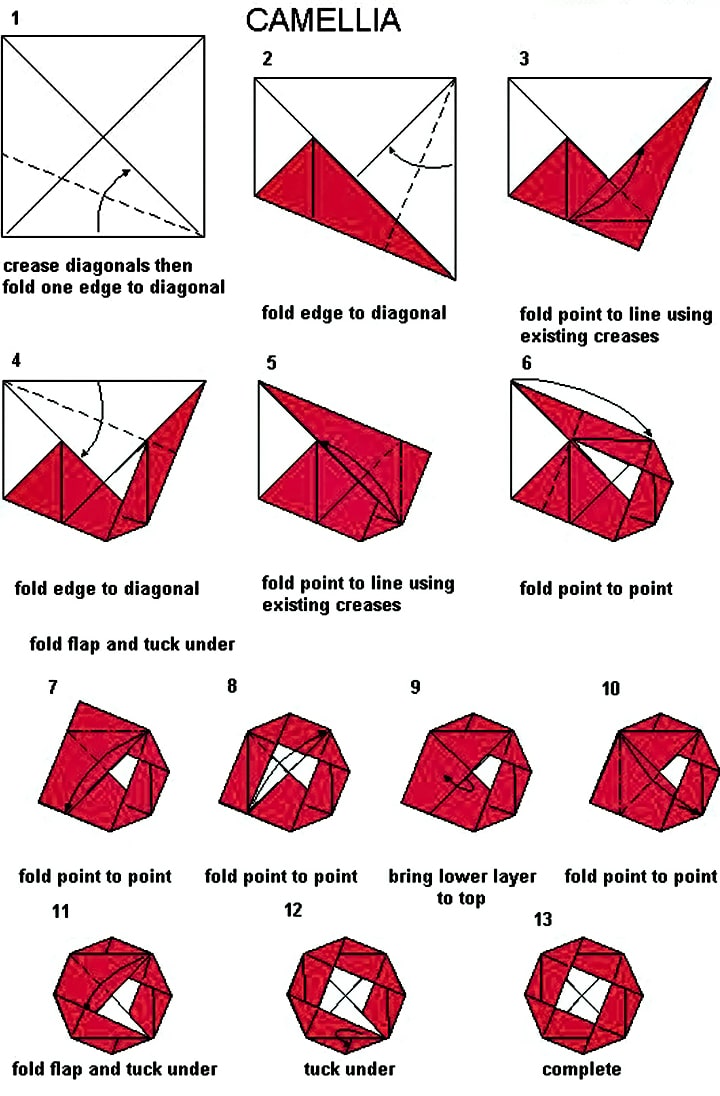
1. Mother’s Day origami flower easy with Camellia Flower Rosette
This stunning stacked origami camellia blossom resembles a tiered rose or rosette. This easy-to-intermediate origami flower requires only three sheets of square paper. First, you’ll need three pieces of square paper. Here are the sizes that we used to create our layered origami camellia flower:
- Largest sheet size: 15 x 15 cm (6 × 6 inches).
- Medium sheet size: 11 x 11 cm (4.3 x 4.3 inches).
- The smallest sheet is 8.5 x 8.5 cm / 3.4 × 3.4 inches.

You will need to construct three origami camellia flowers. You may add even more layers to this flower. Each bigger sheet should be multiplied by 1.3. For example, 15 multiplied by 1.3 is 19.5, hence the next bigger sheet is 19.5 by 19.5 cm. Then, just follow up with the steps below:
- Step 1: Make three origami camellia flowers in three different sizes.
- Step 2: Take the medium flower and press the “petal” section of the flower inwards to make it pop up somewhat.
- Step 3: Place the mini flower within the medium flower. You may rotate the little flower until it is at the desired location. Next, flatten the outside bloom.
- Step 4: Take the huge flower and pop up its petals.
- Step 5: Place the medium flower into the bigger bloom. Once it is in place, you may flatten the entire flower.
- Step 6: To make it appear three-dimensional, pop out all three petal regions of the flower.
>>>> DON’T MISS OUT:
- Crafted elegance with 15 paper flowers for Mother’s day euphoria
- Elevate celebrations with 15 Mothers day table decorations
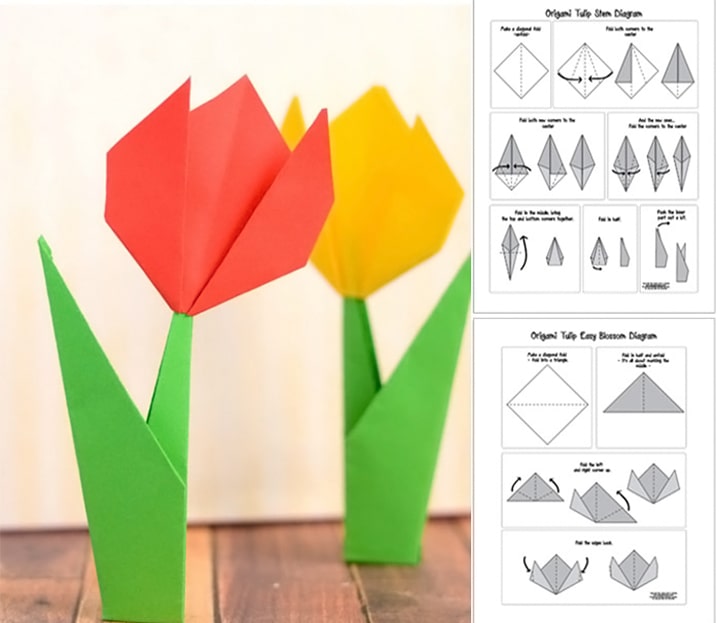
2. Mother’s Day origami flower easy with a simple origami flower
Learn how to fold a simple origami flower with a stem! This Mother’s Day origami flower easy takes only a few minutes to produce and is perfect for folding with children. The steps are as follows:
- Step 1: In the back of the paper, which is typically white, fold the bottom corner up to the top corner, then crease neatly.
- Step 2: Bring the right corner across to the left, making a little pinch to identify the center. Then unfurl.
- Step 3: Take the right point and fold it up at an angle to the pinch mark you just drew. Then, do the same for the left point. The origami flower is completed.
- Step 4: Next, we will create a stem. The reverse of the paper is normally white. Fold the bottom corner upwards to the top corner.
- Step 5: Unfold the preceding step. Fold the bottom right diagonal edge up to match the middle crease.
- Step 6: Bring the top right diagonal edge in line with the middle crease as well. Next, fold the bottom left diagonal edge up to meet the middle crease. Then do the same with the upper diagonal edge.
- Step 7: Fold the figure in half, bringing the bottom piece up. Fold the right side of the form up and to the left at an angle, guided by the inner flaps within.
- Step 8: Unfold the right part and reverse-fold it. This is the full stem/leaf. You may now glue the completed origami flower onto it!

>>>> RELATED TOPIC: 20+ best Mother’s day decoration ideas at home
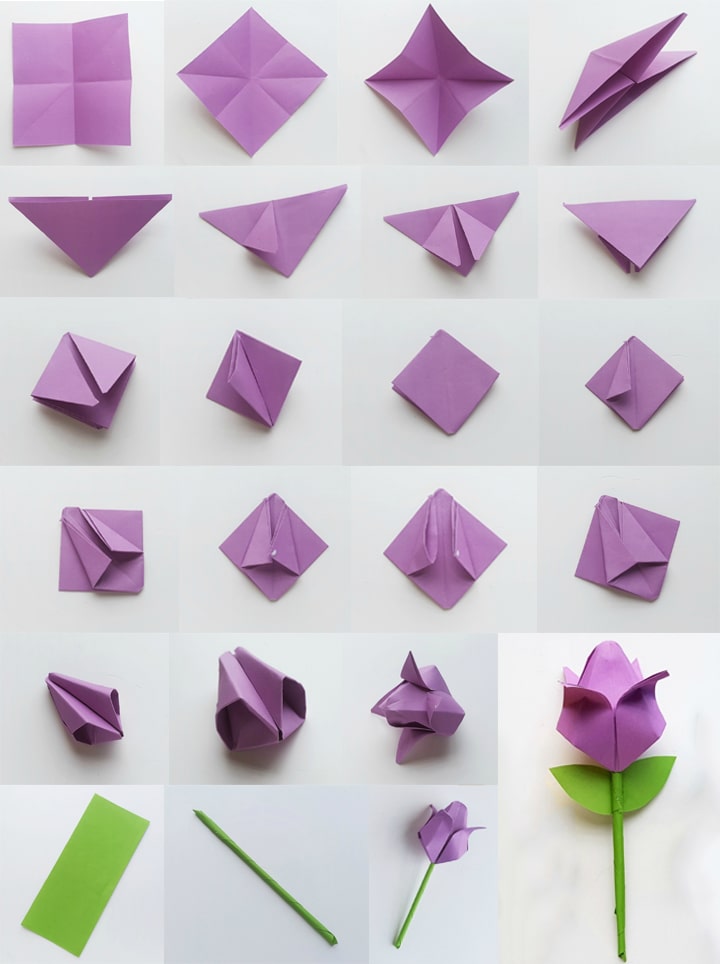
3. Mother’s Day origami flower easy with Tulip Flower
Mother’s Day is almost approaching, and today we have a lovely paper tulip craft for you! These paper flowers are simple to create.
- Step 1: Fold a square of origami paper horizontally, vertically, and diagonally at the center, then open the folds.
- Step 2: Hold the two spots on the right and left sides, then slightly press the two corners. The paper will fold according to the previous folds, forming a triangle. Place the triangle’s largest flat side up and the central point down.
- Step 3: Now, grab one of the triangle’s straps from the upper left side and pull it down to the tip. Similarly, fold down the right-side strap.
- Step 4: Flip the triangle to the opposing side and fold the straps on this side as before. It will form a diamond shape. Take the left-pointed side of the diamond form and bring it to the right, then repeat on the opposite side.
- Step 5: Take the diamond shape’s left pointed strap and bring it to the middle. Similarly, bring the right strap to the middle. Apply adhesive to one of the straps. Open the center of the other strap. Place the adhesive strap into the open strap and push it. Use the same technique on the other side of the object. Blow a little air into the little hole at the bottom of the tulip using your lips, and slightly draw down its petals.
- Step 6: To make a stick, roll a green piece of paper (¼ of an A4) firmly. Insert the stick through the tulip hole on the bottom and glue it there. Glue the leaves onto the stick, and you have a perfect flower.

The above article gives you some tutorials on Mother’s Day origami flower easy. Hope you have a happy memory with your lovely Mom. Remember to contact TeeNavi for support if you have any questions!
>>>> LOOKING FOR MORE: 4 simple and beautiful diy Mothers day wreath ideas


I’m Jennifer Tran, a helpful staff member at TeeNavi. My expertise lies in providing valuable advice on gifts and experiences for special occasions such as Halloween, Christmas, and Thanksgiving. I enjoy suggesting memorable experiences, thoughtful ideas, and unique gifts. As a dependable and supportive colleague, I’m always ready to lend a hand when it comes to selecting gifts for holidays.
Related Posts
Elevate Celebrations With 15 Mothers Day Table Decorations
Do you have any ideas for Mothers Day table decorations yet? Mother’s Day is one...
Feb
20+ Best Mother’s Day Decoration Ideas At Home
With some adorable Mother’s Day decoration ideas at home, let’s explore the world of exquisite...
Feb
4 Simple And Beautiful DIY Mothers Day Wreath Ideas
Making the beautiful DIY Mothers Day wreath for your loving mom is an excellent way...
Feb
9+ Easy Mother’s Day Bath Salts DIY That You Don’t Miss
As Mother’s Day approaches, finding the perfect gift that expresses your love and appreciation can...
Feb
4+ Creative DIY Mothers Day Cup Ideas For You
Embarking on a DIY Mothers Day cup project is a heartfelt way to show your...
Feb
4+ Beautiful Mothers Day Flower Pot Idea That She’ll Love
Mothers Day flower pot idea is a great idea. If you don’t know what gift...
Feb