Mothers Day Ideas
4+ Simple DIY Mother’s Day Picture Frame Ideas
Collection of heartwarming DIY Mother’s Day picture frame ideas brought to you by TeeNavi. In this guide, we’ll explore four simple yet meaningful projects designed to add a personal touch to your Mother’s Day celebrations. These DIY picture frame ideas are perfect for expressing your love and appreciation for Mom uniquely and creatively.
1. Fingerprint DIY Mother’s Day Picture Frame
Fingerprint DIY Mother’s Day photo frame carry deep symbolic meaning and emotional significance. By incorporating fingerprints into the design, these frames symbolize the unique bond and connection between a mother and her children. The fingerprints represent the individuality and identity of each family member, capturing a moment in time that is both personal and intimate.
1.1. Supplies needed
Get ready to embark on a heartwarming crafting adventure with our DIY Mother’s Day picture frame. This delightful project is not only fun but also carries deep sentimental value. To create your personalized masterpiece, you’ll need just a few simple materials:
- Assorted flat white picture frames
- Craft paint
- Photos for framing
- Printable Mother’s Day gift tags
1.2. Instructions
Let’s embark on a heartfelt journey to create a fingerprint Mother’s Day picture frame craft, a delightful project that captures the essence of love and family. Follow these simple steps to craft a personalized masterpiece that Mom will treasure:
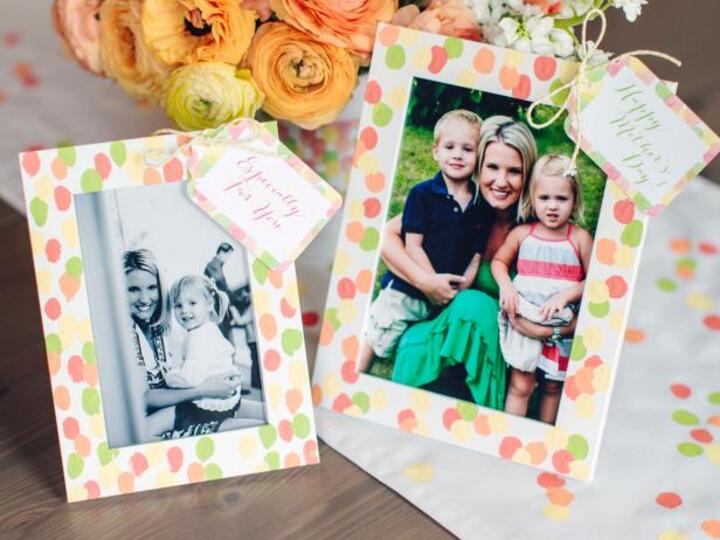
- Step 1: Begin by selecting your first color of paint, starting with the darkest shade. Squeeze a small amount of paint onto a flat surface. Dip your fingertip into the paint and start making fingerprints on the frame in a random pattern, ensuring to leave space between fingerprints for additional colors. Allow the paint to dry for a few minutes before moving on to the next step.
- Step 2: Once the first color has dried, repeat the process with the remaining colors, working from darkest to lightest (refer to Images 2-4). Remember to allow each color to dry before adding the next. To create variety in your design, consider using a different finger for each color of paint.
- Step 3: Once the painted frame has dried completely, carefully reassemble it by replacing the glass and backing. Insert a cherished photo into the frame. Finally, add a printable Mother’s Day gift tag to each frame (refer to Image 2). This DIY picture frame for Mother’s Day is bound to become a treasured keepsake for your loved one.
>>>> LOOKING FOR MORE: 4+ diy Cricut Mother’s Day shadow box ideas at home
2. Mother’s Day photo frame craft ideas by cardboard
Our collection of charming DIY Mother’s Day photo frames using cardboard. These delightful DIY projects offer a creative and heartfelt way to celebrate Mom and showcase your cherished memories together.
2.1. Materials
Get ready to embark on a creative adventure with our Mother’s Day photo frame craft ideas using cardboard. To bring these charming projects to life, you’ll need just a few simple materials:
- Paintbrushes
- Glue gun
- Favorite family photos
- Egg carton
- Paint
- Scissors
- Thin cardboard
>>>> DON’T MISS OUT: 12+ simple Mother’s Day popsicle stick crafts ideas
2.2. Step by step
Let’s explore how to create charming Mother’s Day photo frames using cardboard in just a few simple steps. Follow along as we guide you through the process of crafting these delightful keepsakes:
- Step 1: First, cut out each egg cup from the carton individually. Then, transform the cups into flower shapes by cutting zigzagged and scalloped edges. You and your child can choose to cut out as many or as few as you’d like.
- Step 2: Using thin cardboard, cut out a large rectangle in the shape of your picture, ensuring it is several inches wider than your picture on all sides.
- Step 3: Trace your picture onto the cardboard, then carefully cut out the area around the tracing, ensuring that the cut-out is slightly smaller than your picture. This will create a rectangular frame with the center removed, perfectly framing your image.
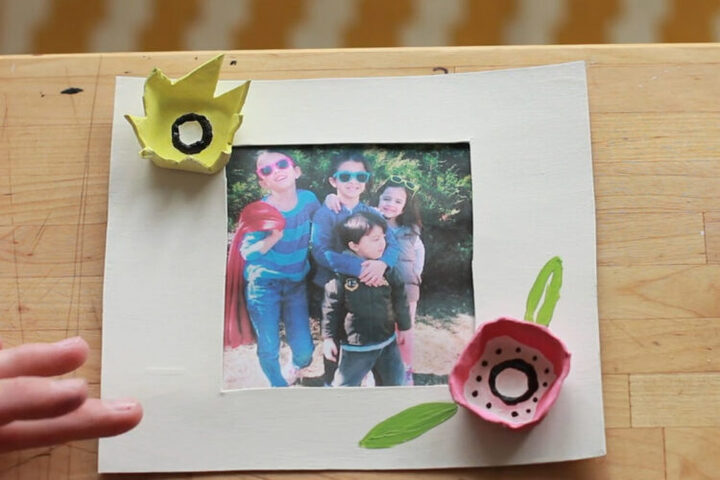
- Step 4: You proceed to apply a layer of paint on the newly cut rectangle. After allowing enough time for the paint to dry completely, attach your photo to the back of the frame with glue. Make sure the image is centered and properly aligned within the frame before applying glue. Press down gently to secure the photo in place. This step not only completes the visual presentation of your DIY photo frame but also adds a personal touch, making it a heartfelt gift that the recipient will cherish for years to come.
- Step 5: Enhance your DIY Mother’s Day picture frame with creative decorations! Paint the flower shapes crafted from the egg carton, then carefully glue them onto the frame. Encourage your child to unleash their creativity by adding glitter, beads, or any other embellishments they desire to the frame. This personalized touch will transform your simple picture frame into a unique and heartfelt gift that your mom will adore.
- Step 6: Once the paint has dried, your Mother’s Day photo frame craft is ready to be enjoyed and proudly displayed.
>>>> CLICK HERE: 34 last minute Mother’s Day gifts to show your love
3. DIY Mother’s Day picture frame with color paper
The Mother’s Day picture frame craft ideas hold deep significance as it symbolizes the effort and thoughtfulness put into creating a personalized gift for Mom. By incorporating color paper into the design, this craft showcases creativity and attention to detail, reflecting the unique bond shared between a mother and her children.
3.1. What you’ll need
The materials needed to create a picture frame with colored paper, a delightful craft idea to celebrate Mom’s special day. To bring this project to life, you’ll require the following:
- Paint and paintbrushes
- 4 thick popsicle sticks
- White and colored paper
- Glue gun or strong glue
- Scissors
- Marker
3.2. Directions
Below are some simple steps to make a DIY Mother’s Day picture frame, helping children make their own for their mothers.
- Step 1: To begin, apply your chosen colors like light pink and light purple onto the popsicle sticks. Once you’ve finished painting, set the sticks aside to dry thoroughly. This step ensures the colors adhere evenly. While waiting for them to dry, you can prepare other materials for your project. After the sticks have dried completely, they’ll be ready for the next steps in your creative endeavor.
- Step 2: While your popsicle sticks are drying, you can create decorations for your frame. Start by placing two pieces of colored paper together and cutting out a heart shape simultaneously to ensure uniformity. Fold both hearts in half and glue one half of one heart to one half of the other, forming a T shape. Repeat this process to make a total of two T-shaped decorations.
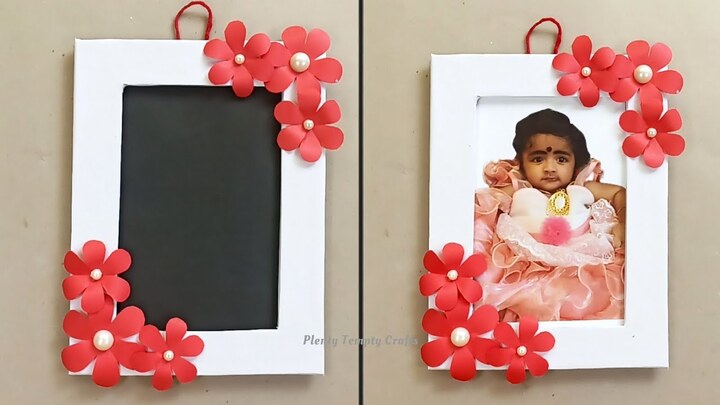
- Step 3: To craft daisies, cut out white flower shapes and affix a yellow circle at their centers using glue. Ensure you create two daisies in total for your project.
- Step 4: After your popsicle sticks have thoroughly dried, proceed to assemble them into a square shape, as demonstrated in the image above, using glue to secure them in place.
- Step 5: Enhance your frame by attaching the small handmade decorations to each corner, and if desired, inscribe a personalized message. Complete the frame by affixing a picture to the back using glue. Now, all that remains is to present your heartfelt creation to someone special, making it a memorable gift.
4. Mother’s Day picture frame craft for kids
Picture frame craft for kids holds profound significance as it provides children with an opportunity to express their love, appreciation, and creativity for their mothers. Through this craft, children can actively participate in celebrating Mother’s Day by creating a personalized and heartfelt gift for their moms.
4.1. Materials needed
Introducing the materials needed to create a DIY Mother’s Day picture frame, a delightful project that allows children to express their love and creativity for their moms. Here’s what you’ll need:
- Mod podge
- Paint cup (Disposable plastic cups recommended.)
- Pencil
- White paper
- White roll paper
- Camera
- Craft flowers (similar options available, sought discounted varieties at Michael’s.)
- X-Acto knife
- Wooden craft frames (I found mine at Michael’s for $1 a piece. The ones I linked to are similar with different dimensions and are less than a $1 a piece when you buy 24.)
- Sponge brushes
- Book of scrapbook paper (I think lightweight scrapbook paper is better for Mod Podge.)
- Scissors
- Sharpie
- Masking tape
- Sandpaper
- Hot glue
4.2. How to make
Here are the steps for kids to create a Mother’s Day picture frame craft:
- Step 1: Begin by drawing word bubbles in Sharpie, ensuring you have enough copies for each student in the class. Encourage the children to complete the sentence starter, such as “My mom…” or “My mom is…”, using their own thoughts and words. Once they’ve written their phrases inside the word bubbles using Sharpie, carefully cut out each bubble along the black outline to maintain visibility.
- Step 2: Create a designated photo booth area by hanging a large piece of white paper as a backdrop. Utilize masking tape to securely attach each child’s word bubble to the backdrop at the height of their mouth. This setup ensures consistency and clarity in the photos. With the booth prepared, proceed to capture a picture of each child with their personalized word bubble. This activity not only fosters creativity but also provides a memorable visual representation of each child’s sentiment towards their mother.
- Step 3: Provide Mother’s Day photo frame craft ideas to the kids and guide them in selecting their preferred scrapbook paper, encouraging them to consider their mom’s style, favorite colors, or patterns. Once they have chosen their paper, assist them in lining up the frame on two sides and tracing the remaining two sides in pencil. Emphasize that precision is not crucial but ensure the size is adequate.
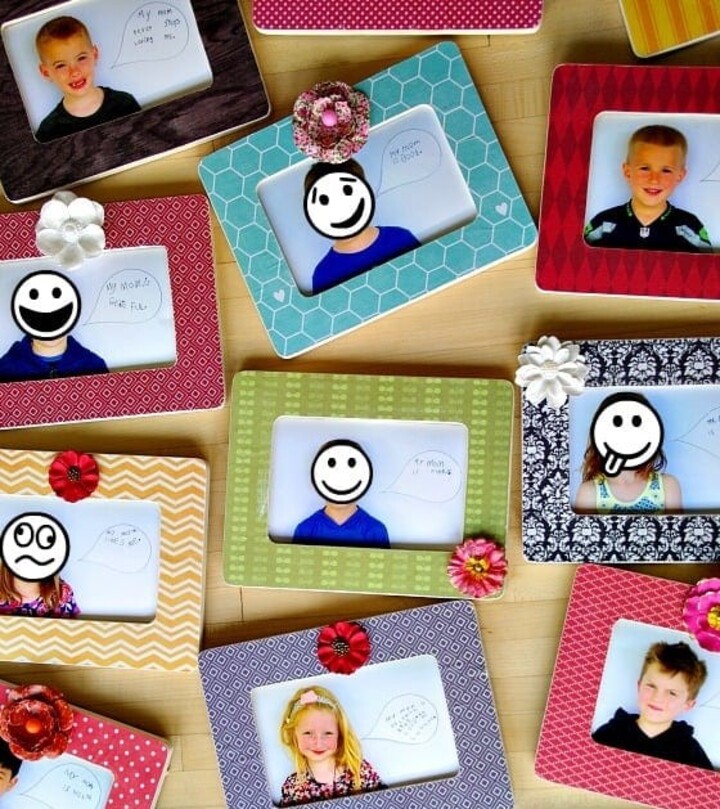
- Step 4: While the kids are tracing the frame, cut out the selected scrapbook paper. Simultaneously, have the children write their names on the back of their frames for identification. Once the frames are traced and names are written, guide the kids in applying Mod Podge to the frame’s surface. Carefully lay the cut-out paper on top, ensuring proper alignment. Offer helpful tips for using Mod Podge, and then allow the frames to dry thoroughly before proceeding to the next step in the crafting process.
- Step 5: After completing the Mod Podge application, the next step involved using the X-Acto knife to precisely cut around the edges and inside of the frame. This task was undertaken independently at home to ensure careful and accurate execution. Once the cutting process was finished, the frames were ready for further embellishment or insertion of photographs.
- Step 6: To complete the DIY picture frame for Mother’s Day, the children can proceed by applying a final coat of Mod Podge onto the top surface of the frame. This step adds a protective layer and enhances the overall finish of the project. For added decoration, encourage the kids to use hot glue to attach a flower accent to the corner of the frame, providing a charming and personalized touch. Finally, guide them in inserting their chosen pictures into the frames, transforming their creations into heartfelt gifts ready to be presented to their mothers.
In conclusion, DIY Mother’s Day picture frame presented by TeeNavi offers a heartfelt and creative way to celebrate the special bond between mothers and their children. Let TeeNavi inspire you to embark on these DIY adventures and make this Mother’s Day truly memorable for the incredible moms in your life.
>>>> WATCH NOW: 17+ stylish and cute outfits for Mothers Day ideas


I’m Jennifer Tran, a helpful staff member at TeeNavi. My expertise lies in providing valuable advice on gifts and experiences for special occasions such as Halloween, Christmas, and Thanksgiving. I enjoy suggesting memorable experiences, thoughtful ideas, and unique gifts. As a dependable and supportive colleague, I’m always ready to lend a hand when it comes to selecting gifts for holidays.
Related Posts
20+ Mothers Day Games To Play For Mom And Kids
Are you looking for unique ideas for Mothers Day games to play? Mother’s Day is...
Apr
Make Mom Smile With These 30 Mother’s Day Activity Suggestions
Mother’s Day 2024 is just around the corner, have you got some Mother’s Day activity...
Apr
12+ Simple But Unique Mother’s Day Decoration Ideas For Church
Are you looking for wonderful Mother’s Day decoration ideas for church? Mother’s Day is a...
Apr
3 Mother’s Day Origami Flower Easy Craft Your Love In Every Petal
Make your own Mother’s Day origami flower easy, why not? These flower origami ideas are...
Apr
15+ Mother’s Day Mason Jar Craft Ideas For Heartfelt Gifts
Mother’s Day is an ideal opportunity to express your love and gratitude for the amazing...
Apr
How To Make DIY Mother’s Day Bouquet: Step-to-step Tutorials
Mother’s Day 2024 is coming, do you have any great ideas for a DIY Mother’s...
Apr